Ethereum’s Ether (ETH) is the new rock star of digital currencies (also called cryptocurrency). Thus Ethereum is the second largest cryptocurrency – measured in terms of capitalization – after Bitcoin. Learn in this article everything about how you can buy Ethereum fast and secure.
A detailed introduction what Ethereum is about can be found here:
What’s Ethereum? – An introduction
Quick-Start Guide to buy Ethereum
For the impatient, below you can find the four main steps how to quickly and safely buy Ethereum ether (ETH) :
- Step:
First download and install an Ethereum Wallet software, such as the “official” Ethereum Wallet or sign-up at an online wallet service such as Coinbase¹. - Step:
After you have installed the software or signed up, you need to create a wallet (which is similar to a bank account). Each wallet has a globally unique Ethereum address (similar to a bank account number). - Step:
Now select an online provider like Coinbase¹ Bitpanda¹, AnyCoinDirect¹ or any other service of your choice. There you can purchase the desired amount of ether (ETH). The ether you’ve bought there can be sent directly to the Ethereum wallet address you previously created (this Ethereum wallet adress can be specified during the buy process). - Step:
Usually after purchased it will take only a few minutes until the transaction has been successfully completed. To view the current state of the transaction, you can use this service https://etherchain.org for free. Just type in your Ethereum wallet address and the service will list you all the incoming and outgoing transactions for your “Account”. Here you should see your previous purchase as incoming transaction then. Finished.
Trade Ethereum without a wallet
For those people who don’t want to create a wallet, but still want to participate on the price development of Ethereum, we found the service provider Plus500. This service provider is offering CFDs (Contract for Difference) based on Ethereum. So you can buy Ethereum CFDs online using USD, which is then developing like the underlying Ethereum price.
The CFD broker provides a very clear platform and there are no commissions for trading CFDs. Financing takes place via the spread, the difference between the purchase price and the selling price of the contracts.
Introduction
Cryptocurrencies have been around for a relatively long time, but Ethereum combines three very interesting things together:
- Cryptocurrency
- A decentralized, anonymous “account book” = Blockchain
- Digital Contracts = Smart Contracts
It can therefore be used as a digital currency, where no central office, such as a bank, monitors how much money is deposited or deducted from an account. Instead, this is “monitored” decentrally by all participants of the Ethereum network. The technology used for this is called “blockchain”. This does not differ significantly from Bitcoin, which also uses Blockchain for this purpose.
Smart Contract
What makes Ethereum even more exciting are the so-called “Smart Contracts”. These are “programmed” contracts that everyone can create and share with others. For example, it is conceivable that future rental contracts will no longer be concluded in writing but by “Smart Contract”. The landlord sends this Smart Contract to the tenant via the Ethereum network. The latter agrees to the conditions set out therein. Based on the acceptance the contract is “confirmed” by the Ethereum network as a whole. That means the members of the network are, so to speak, the witnesses to the treaty.
That alone is a great thing. But what makes it even more convenient is that the contract not only defines the payment modalities, but also implements them at the same time. As soon as the contract has been accepted, the hirer’s Ethereum account will regularly pay the rent in the agreed instalments. Without paperwork, standing orders, account opening, etc.
The possibilities are enormous. Just think of the coming flood of IoT devices. Many of these devices will provide chargeable, recurring services that depend on various factors. These have to be invoiced flexibly but simply and comprehensibly. Smart contracts are perfect for this purpose.
Buying Ethereum = opportunity and risk
These are reasons enough to consider Ethereum as an “investment object”. At this point, however, a clear warning: Ethereum is very young. That’s opportunity and risk at the same time. It is not yet possible to predict whether the system will be technically capable of processing millions, perhaps even billions, of Smart Contracts. Many legal questions have also not yet been clarified, as this is such an unusual form of exchange of goods and services that has not yet existed and that many jurists are simply overtaxed. In addition, Ethereum is technologically complex. And it is so complex that even experienced technologists need some time to get through it. This complexity makes it more vulnerable to attacks.
Hope for the best, expect the worst
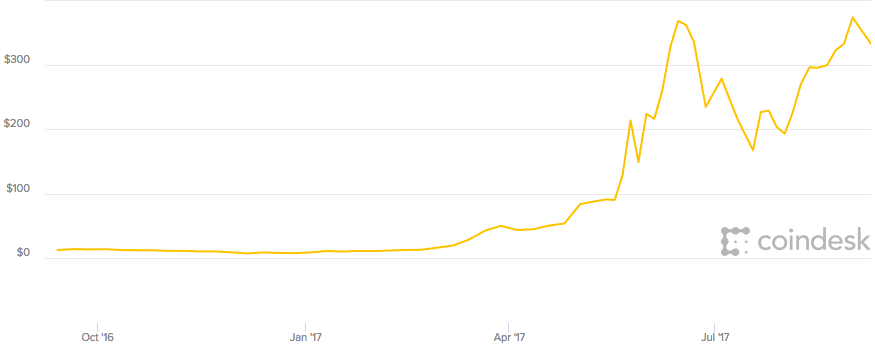
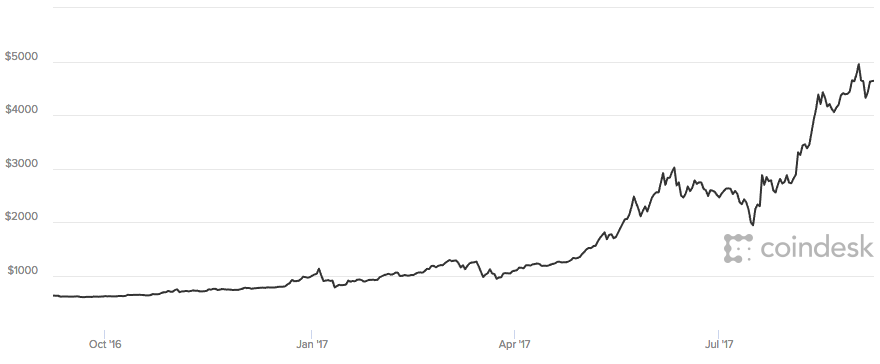
So you should only invest the money in Ethereum, which you are willing to lose in its worst case. However, if the Ethereum price rises, you can make good profits. Bitcoin, for example, had a high of 1100 USD in 2013. So, whoever bought 1000 Bitcoins (BTC) in 2010 at a price of 1 USD was a millionaire three years later. After that, however, the share price has collapsed and since then has moved around the 400 – 500 USD mark. Still not bad, for someone who got in for 1 USD per bitcoin. It remains to be seen whether Ethereum will have a similar development. As of October 2016, the price is already around 14 USD per Ether (ETH), which is the unit in the Ethereum network.
Update [24th of May 2017]: Meanwhile, the price for Bitcoin is at 2700 USD and the price for Ethereum (ETH) is now 204 USD!
Update [7th of September 2017]: Meanwhile, the price for Bitcoin is at 4500 USD and the price for Ethereum (ETH) is now 333 USD!
To buy Ethereum – step by step
Whoever has gotten a taste for Ether and wants to buy it, just has to read on. I will explain step by step how to get the digital gold.
Step 1: Create your Ether Wallet
As with Bitcoin, Ether requires a so-called “wallet” for Ether. This digital wallet is literally the key to buying and selling Ether. More concretely, by creating a wallet you create a wallet that only you have access to via your password.
Which Wallet is right for me?
There are basically four different types of wallets, all of which have their advantages and disadvantages:
| Wallet Type | Description | Advantages | Disadvantages |
|---|---|---|---|
| Offline-Wallet | Locally installed Wallet Software. | Very safe. Keys and data in your own hands. Execution of Smart Contracts possible. | Hard disk broken -> money gone. That's why backup! Software must be installed and updated regularly. |
| Online-Wallet | Wallet hosted by an online service provider (in the browser). | Very easy to handle. Supplier takes care of the backup. | Susceptible to phishing attacks. Private key sometimes cannot be exported. Then the rule is: If the provider goes bankrupt, money probably also goes away. |
| Hardware-Wallet | Wallet, e. g. located on a USB stick. | Extremely safe variant. | External device must always be at hand. Device lost or broken, money gone. The device initially costs from 30 Euro upwards. |
| Paper-Wallet | Wallet is printed on paper, similar to the TAN procedure for online banking. | Very safe variant. | Very complex to handle. Lose the note, lose the money. |
In this tutorial I would like to go into more detail about the two most common and simplest variants of wallets: Online and Offline Wallets.
An offline wallet is a software that is installed locally. You have full access to both the keys that protect the wallet and all other data of the wallet. This variant is extremely secure, as long as you make regular backups and protect yourself sufficiently against virus attacks and the like. The disadvantage of this variant is, however, that if no backup has been made and the hard disk is broken, your money is gone. In addition, the software must be installed and updated regularly.
An online wallet, on the other hand, is much more convenient and simple. It is provided by an online service provider. You just need to log in and have a fully functional wallet available immediately. The provider also takes care of the backup. The disadvantage of this variant, however, is that suppliers often do not offer the keys for export. This means that you are bound to the provider with your wallet. In addition, increased caution is required to avoid becoming the victim of a phishing attack by external parties, as is often the case with online banking.
Create an online wallet at Coinbase
As a first step, we create an online wallet at Coinbase¹. This provider is one of the largest in the world and has a very good reputation in the crypto community. If you don’t want an online wallet you don’t need to use it, but you should still create an account here, because we will need it later in the tutorial to buy Ether.
So change to Coinbase¹ and register there. This link¹ also gives you $10 free startup money when you buy Bitcoin or Ether for $100 or more. Not a bad deal, right?
Congratulations. Once you have successfully set up your Coinbase account, you can already buy Ethereum and sell Ethereum via the online Wallet. If you would like to install the more secure – but somewhat more complex – offline wallet, then just read on.
Installing the Offline Wallet
An important warning: If you delete your offline wallet, you will also delete your money! The same applies if you forget your unlock password. Then you just can’t get your money anymore. So, remember two important principles:
- Backup offline wallet regularly!
- Never forget your wallet password!
While it was only possible at first to create and edit an offline wallet using the command line tool GETH, the “official” graphical tool for this has been available for some time now: Ethereum Wallet . This makes it much easier for technically less experienced users in particular.
Now go to the download area for the Ethereum Wallet software and scroll down to the “Downloads” section of the latest version and download the zip file for your operating system. For Mac, for example, the file with a name like “Ethereum-Wallet-macosx-X-Y-Z. zip”. Similar for Windows or Linux. Unzip the downloaded zip file and start the wallet. On Windows, for example, by executing the file “Ethereum-Wallet.exe”.
Again a warning: Ethereum Wallet is still under development. In other words, you will have to expect mistakes when using it, in the worst case you will lose your money. Therefore: Backup, backup, backup! Usually the current version should work without major problems.
Select the Ethereum Network
After the first start of the wallet software a dialog appears. After a while you can see on this dialog below, that the download of the so called “Blockchain” is started immediately in the background. This can be considered as a kind of “account book”, in which all transactions ever made in the Ethereum network are recorded. This is necessary so that you can understand who has made how many transactions. Remember: There is no central authority, such as a bank that could know that. Therefore, every participant has to download this blockchain by himself. And “download” means that other participants from the network offer you this blockchain for download peer to peer.
In the example below, these are currently 9 peers (participants). The blockchain is currently around 4 GB in size and is constantly growing. So make sure that you have enough storage space available. In addition, the complete download may take several hours.
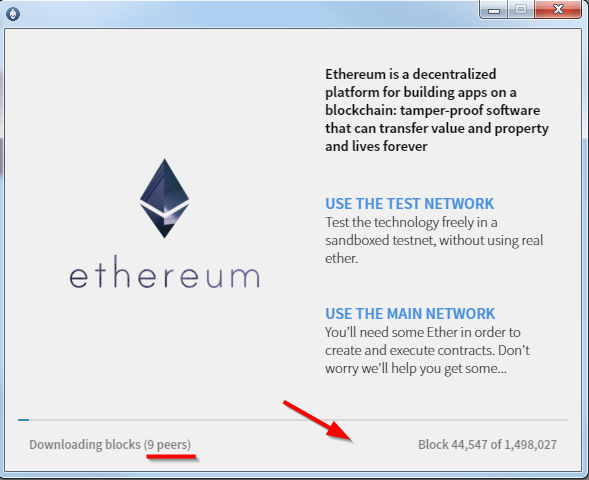
Since the download of the blockchain is done in the background, we can continue with the setup of the wallet directly and don’t have to wait. Click on “USE THE MAIN NETWORK”.
Importing a pre-sale file
You can skip the next question “Do you have a wallet file?” with “SKIP”. This is only relevant if you pre-ordered Ether before the official release.
Assigning a Wallet Password and Creating a Wallet
Now it’s getting very important: In the next dialog box, “Protect your account” you are asked to choose a secure password to encrypt your wallet. Take this dialogue seriously and think about a really secure, long password. If someone else can guess this password, he can steal all your ethers in its worst case. In addition, this password cannot be reset. Once forgotten = money gone. I recommend that you only write down this password in handwritten form somewhere and then keep it in a safe place, similar to TANs in online banking.
Your wallet will then be created. Congratulations!
Account and Address
Each wallet also has at least one account, the “Main Account”. An account can best be compared to a bank account. It has a globally unique “account number”, the “address” and can be used to make “Ether transfers”.
Hint: If you want to remain anonymous, keep this address as private as possible. Because anyone who knows this address can use the blockchain to find out which transactions you have made in the past. As long as the address cannot be assigned to a real person, this is no problem. For example, the https://etherchain.org website can be used to see which transactions were carried out via a specific Ether address. Here is an example for the address: 0x7ed1e469fcb3ee19c0366d829e291451be638e59. I don’t know who owns it, but the owner is definitely wealthy!
After you have entered your password and your wallet has been generated, you will see a dialog like this:

There you will see for the first time your “account number”, i. e. the Ether address assigned to your main account. If you want to make transfers in the future, you must always specify this long text.
Hint: You should copy and paste the address here and save it somewhere in digital format so that you can quickly access it later on. If a copy & paste doesn’t work here, this is probably a bug again. As a workaround you can click on “DEPOSIT BITCOIN”. The address is listed there under Destination. Here the copying works.
Await complete Blockchain Download
Once you’ve arrived at this point, now you have three different options:
- You wait until the blockchain is completely downloaded. If this takes longer than one day, you should start over again and sync your system time with the internet (see above).
- You already transfer Ether in the form of Bitcoins, which you have already bought by clicking on “DEPOSIT BITCOIN”. As long as you haven’t downloaded the blockchain completely and you haven’t made a backup of your wallet yet, I don’t recommend this step.
- You quit the application and restart it and then click on “SKIP PEER SEARCH” to get to the graphical user interface. You need to close it, because the dialog does not offer such a possibility at this point. This is a small bug that will surely be fixed in future versions.

I recommend you here step one to keep potential errors on a minimum.
Step 2: Start Offline Wallet Software
After you have downloaded the complete blockchain or restarted the application and clicked on “SKIP PEER SEARCH”, the actual graphical user interface “MIST” of the Ethereum Wallet will show up:
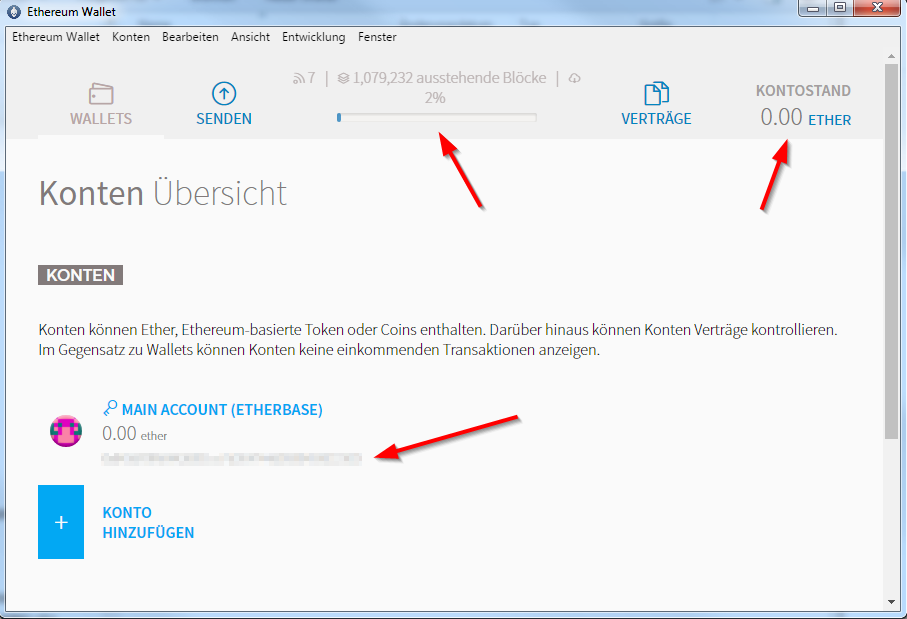
This – in my opinion – very neatly designed interface provides the most important information at a glance. In the top-middle you can see the current status of the Blockchain download. At the top-right you can see your Ether Credit balance and at the left below the “Main Account” you can see the corresponding address, i. e. your “Account Number”, which you will need for all future transactions.
Hint: It’s a bit annoying that copy & paste of the address – at least for me – sometimes doesn’t work. I always click on “MAIN ACCOUNT” and then on “Add Ether with Bitcoin”. In the dialog box that then appears, you can copy the address (below destination).
Step 3: Backup, backup, backup
Before you continue, I strongly recommend that you make a backup of your wallet. To do so, simply click on Accounts -> Backup -> Accounts in the UI. A folder then opens. There is a folder with name “keystore” in it. This folder contains the so-called wallet file. It has a somewhat “shapeless” name and starts with UTC-. This file contains, among other things, the ETH address and the key with which your Ether is “encrypted”. It’s making sure you’re the only one who can get your ether. This key is encrypted with your Wallet password. That’s why it’s so important that your wallet password is strong enough.
To make a backup, copy this file to a safe place. There are two large fractions of opinions of where you best back up a wallet file. One is convinced that a local copy, e. g. to an external hard drive, is the safest and best way. Others say that it is better to back up the file in a cloud service such as Dropbox. The former has the disadvantage: Hard disk is broken, backup is broken. The second variant has the disadvantage that the file with the key is located in the cloud. However, since the key itself is encrypted with your Wallet password, this procedure is relatively secure.
Step 4: Buy Ethereum
Finally! Only after you have installed the wallet and made a backup of it, as well as your blockchain has been downloaded completely, you should do it and buy Ethereum. There are two main ways to buy Ether:
- You buy Ethereum directly from an online service provider and pay by credit card or bank account.
- You first buy Bitcoins from an online service provider and then “convert” these Bitcoins to your Ethereum address with the help of a service like Shapeshift.
If you are new to cryptocurrencies, I would recommend to buy Ethereum directly from an online service provider and not using Bitcoin because then you would also need a wallet for Bitcoin. For this reason, I will only discuss the first way of direct purchase here.
Buy Ethereum via Coinbase
A good service I have been using for some time for my purchases of Ether is Coinbase¹. The American provider is one of the largest providers of its kind and enjoys an exceptionally good reputation in the crypto community. The main advantage of this supplier is that you can buy Ethereum and sell Ethereum there. You will also get a free online wallet if the installation of your offline wallet does not work or if it is too costly for you.
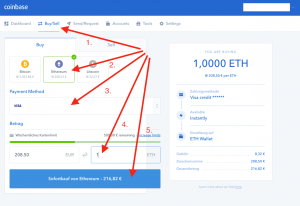
After you have created a free Coinbase account, you can finally buy Ethereum. To do so, first sign-in at Coinbase and then click on “Buy/Sell” in the upper bar. There you can buy Ethereum.
The purchased amount of Ether will be credited to your online wallet. If you want to transfer it to your offline wallet (and want to manage it yourself) you can transfer the purchased Ether by clicking on “Send” in the upper bar.
In the dialog box that then appears, enter the ETH address of your offline wallet in Recipient, select the “ETH Wallet” as source and specify the number of ethers that you want to transfer. After you click on “Send funds” it takes a while until the amount of your offline wallet has been credited. This can take up to one hour. You can check the progress of the transaction on etherchain.org by typing in your Ether Address at the top right:
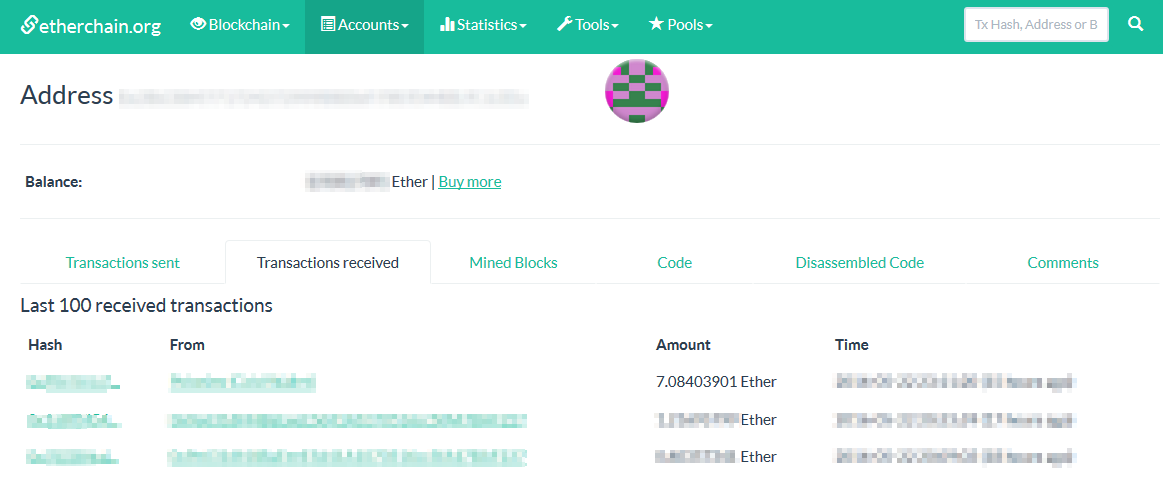
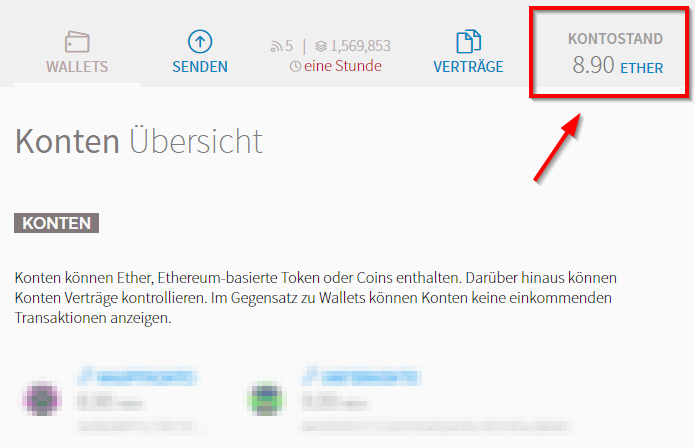
After a while you will see in the MIST-UI that the Ether has been credited to you. Congratulations on your Ether purchase!
Alternatives to Coinbase
Until recently I still recommended Bitpanda as an alternative. However, I think the service is so overpriced lately that I can’t recommend it here with a clear conscience. Instead, I found another service that is comparatively simple and trustworthy and now I recommend this service: Cex.io¹. Simply log-in there, top up from your credit card or bank account and then transfer Ether to your wallet address. After a while you will be credited with the Ether amount purchased in your offline wallet.
| ¹Affiliate link |
| Note: The content on ethblog.de is for information purposes only and does not constitute investment advice or any other recommendation within the meaning of the Securities Trading Act. |
- How to buy Ethereum, Ether, ETH? - April 12, 2018
- How to sell Ethereum, Ether, ETH? - March 19, 2018
- How to buy and sell Ripple? - March 15, 2018

